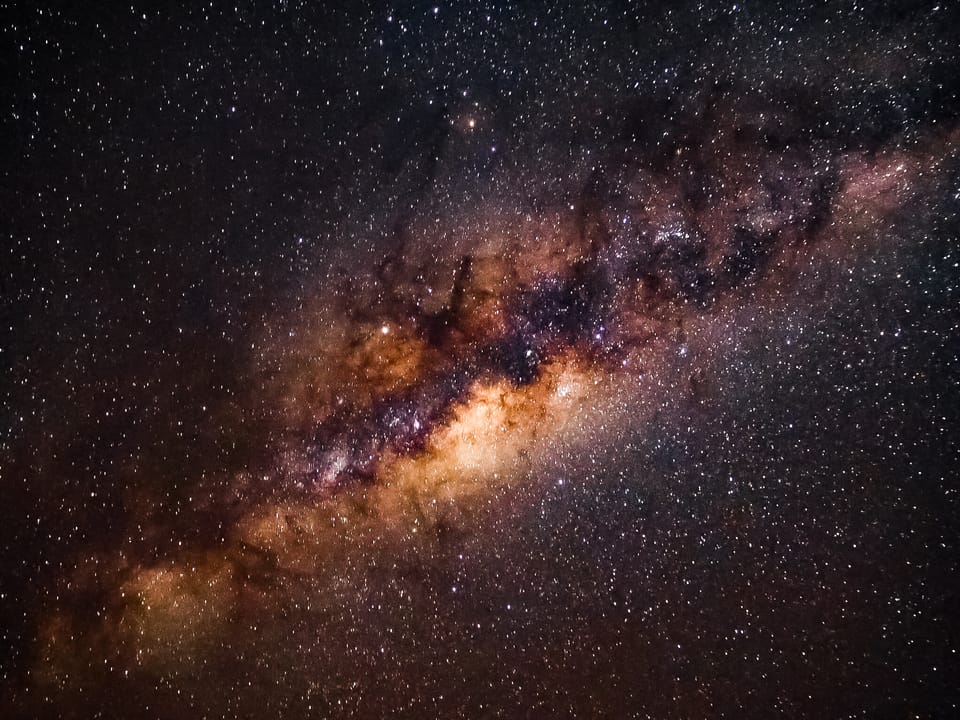
Capturing the Night Sky - Part 2: Stepping Up with a Tracking Mount
In Part 1, we explored how you can begin capturing the night sky using just a camera, tripod, and patience. But what happens when you want to go deeper, beyond wide-field Milky Way shots and into the territory of galaxies and nebulae? That’s where a tracking mount enters the scene.
Why You Might Want to Track the Stars
If you’ve ever attempted a longer exposure and ended up with streaky stars, you’ve witnessed Earth’s rotation in action. A tracking mount compensates for that movement by slowly rotating your camera (or telescope) at the same rate the stars appear to move.
This allows you to:
- Extend your exposures beyond 20 or 30 seconds
- Keep stars sharp, even at telephoto focal lengths
- Lower your ISO and noise while increasing detail
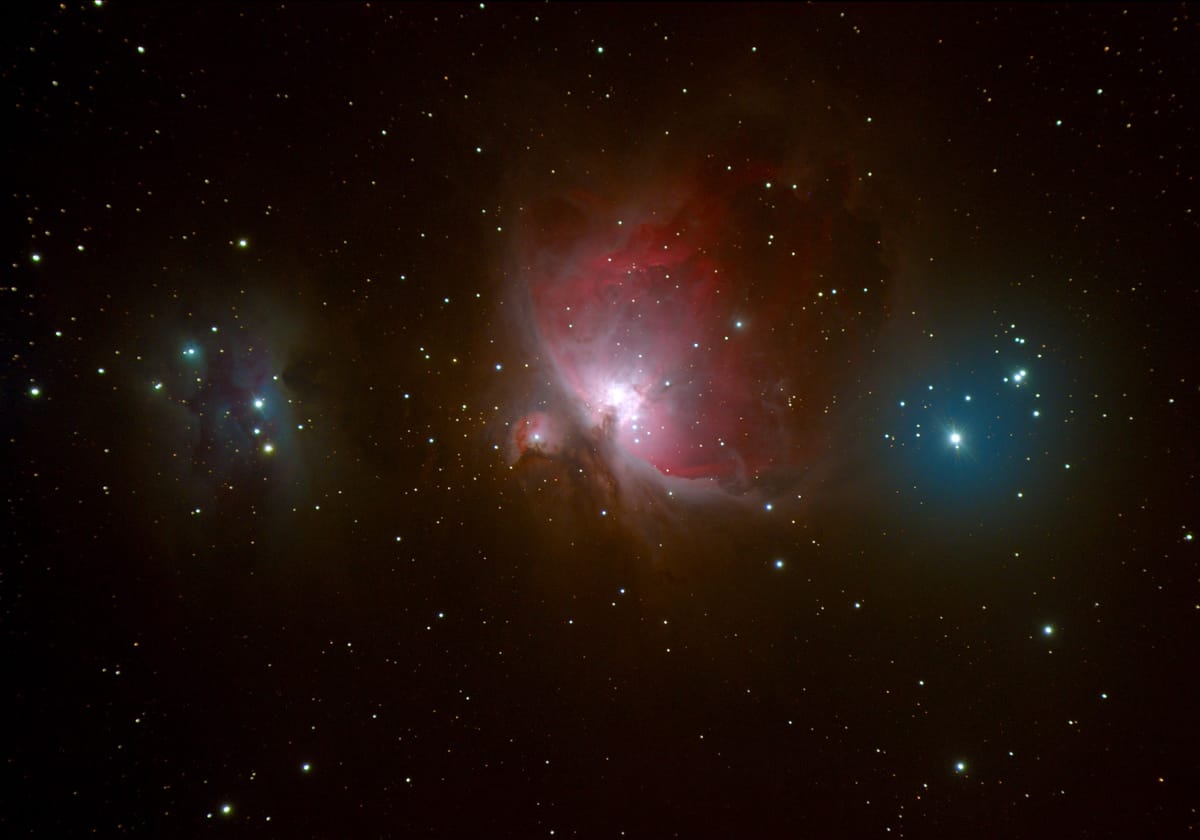
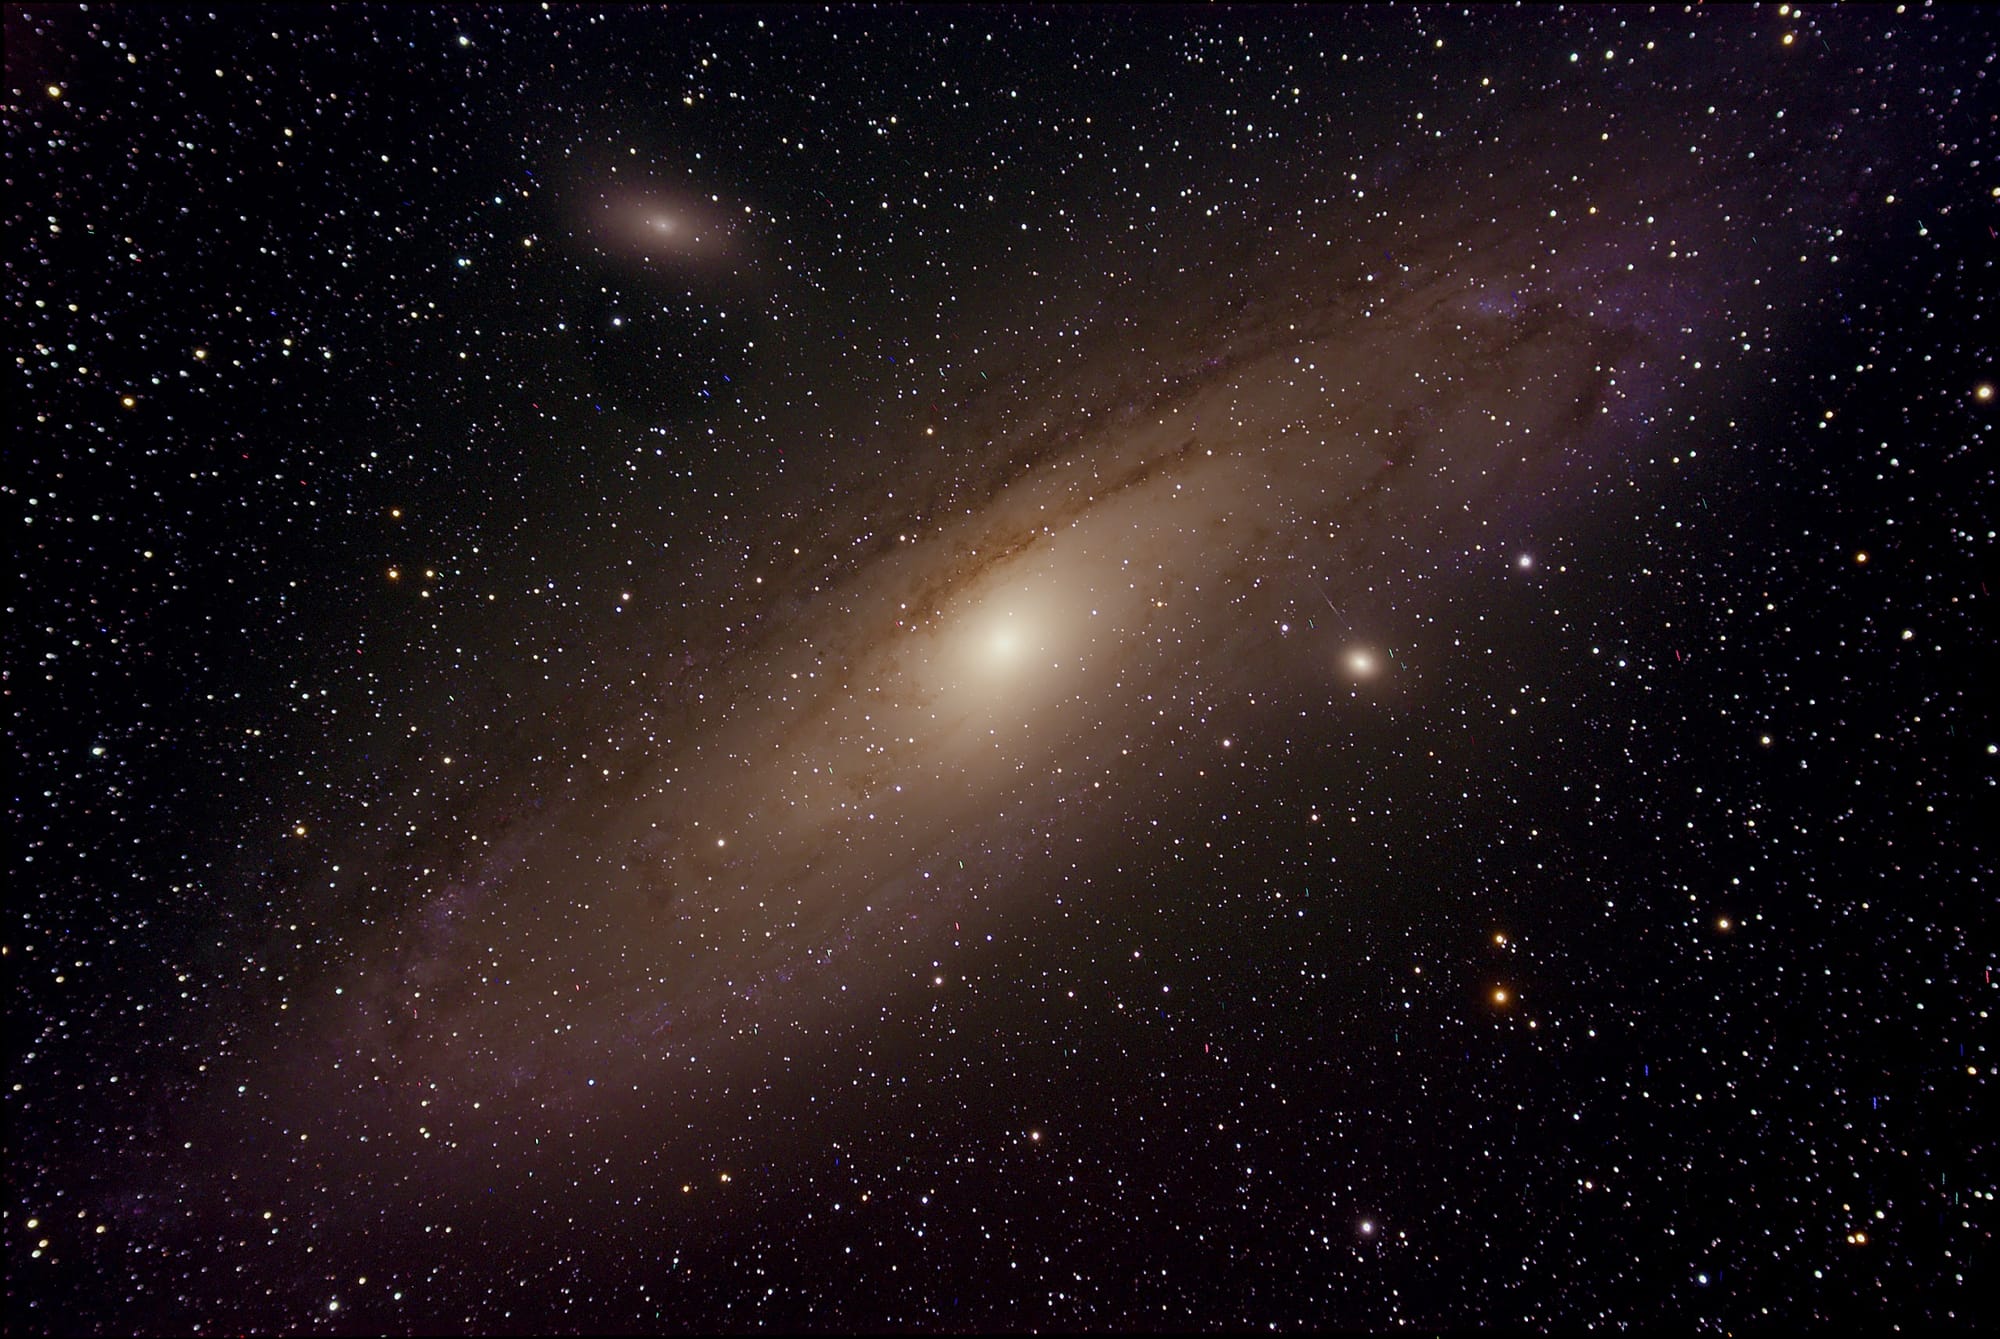
- Capture stunning deep-sky objects like the Orion Nebula or the Andromeda Galaxy
In short, a tracking mount is your gateway if you want more out of your astrophotography.
The Gear: What You’ll Need
Your choice of gear will depend on how far down the astrophotography rabbit hole you’re ready to go. Whether you're a wide-field wanderer or preparing for deep-sky targets, here’s a practical breakdown to match your ambition.
If you're just getting started and want something portable and beginner-friendly, a compact star tracker is the way to go. For those planning to shoot at longer focal lengths or thinking about using a small telescope, it’s worth stepping up to a more robust equatorial mount.
For portable tracking, two excellent options are the Sky-Watcher Star Adventurer 2i, known for its reliable tracking and mobile app control, and the iOptron SkyGuider Pro, which has slightly better payload capacity and a more compact design. Pair either of these with a solid tripod, a fast lens like a 135mm f/2, and you're ready to capture stunning wide-field shots of the Milky Way, Orion, or Andromeda.
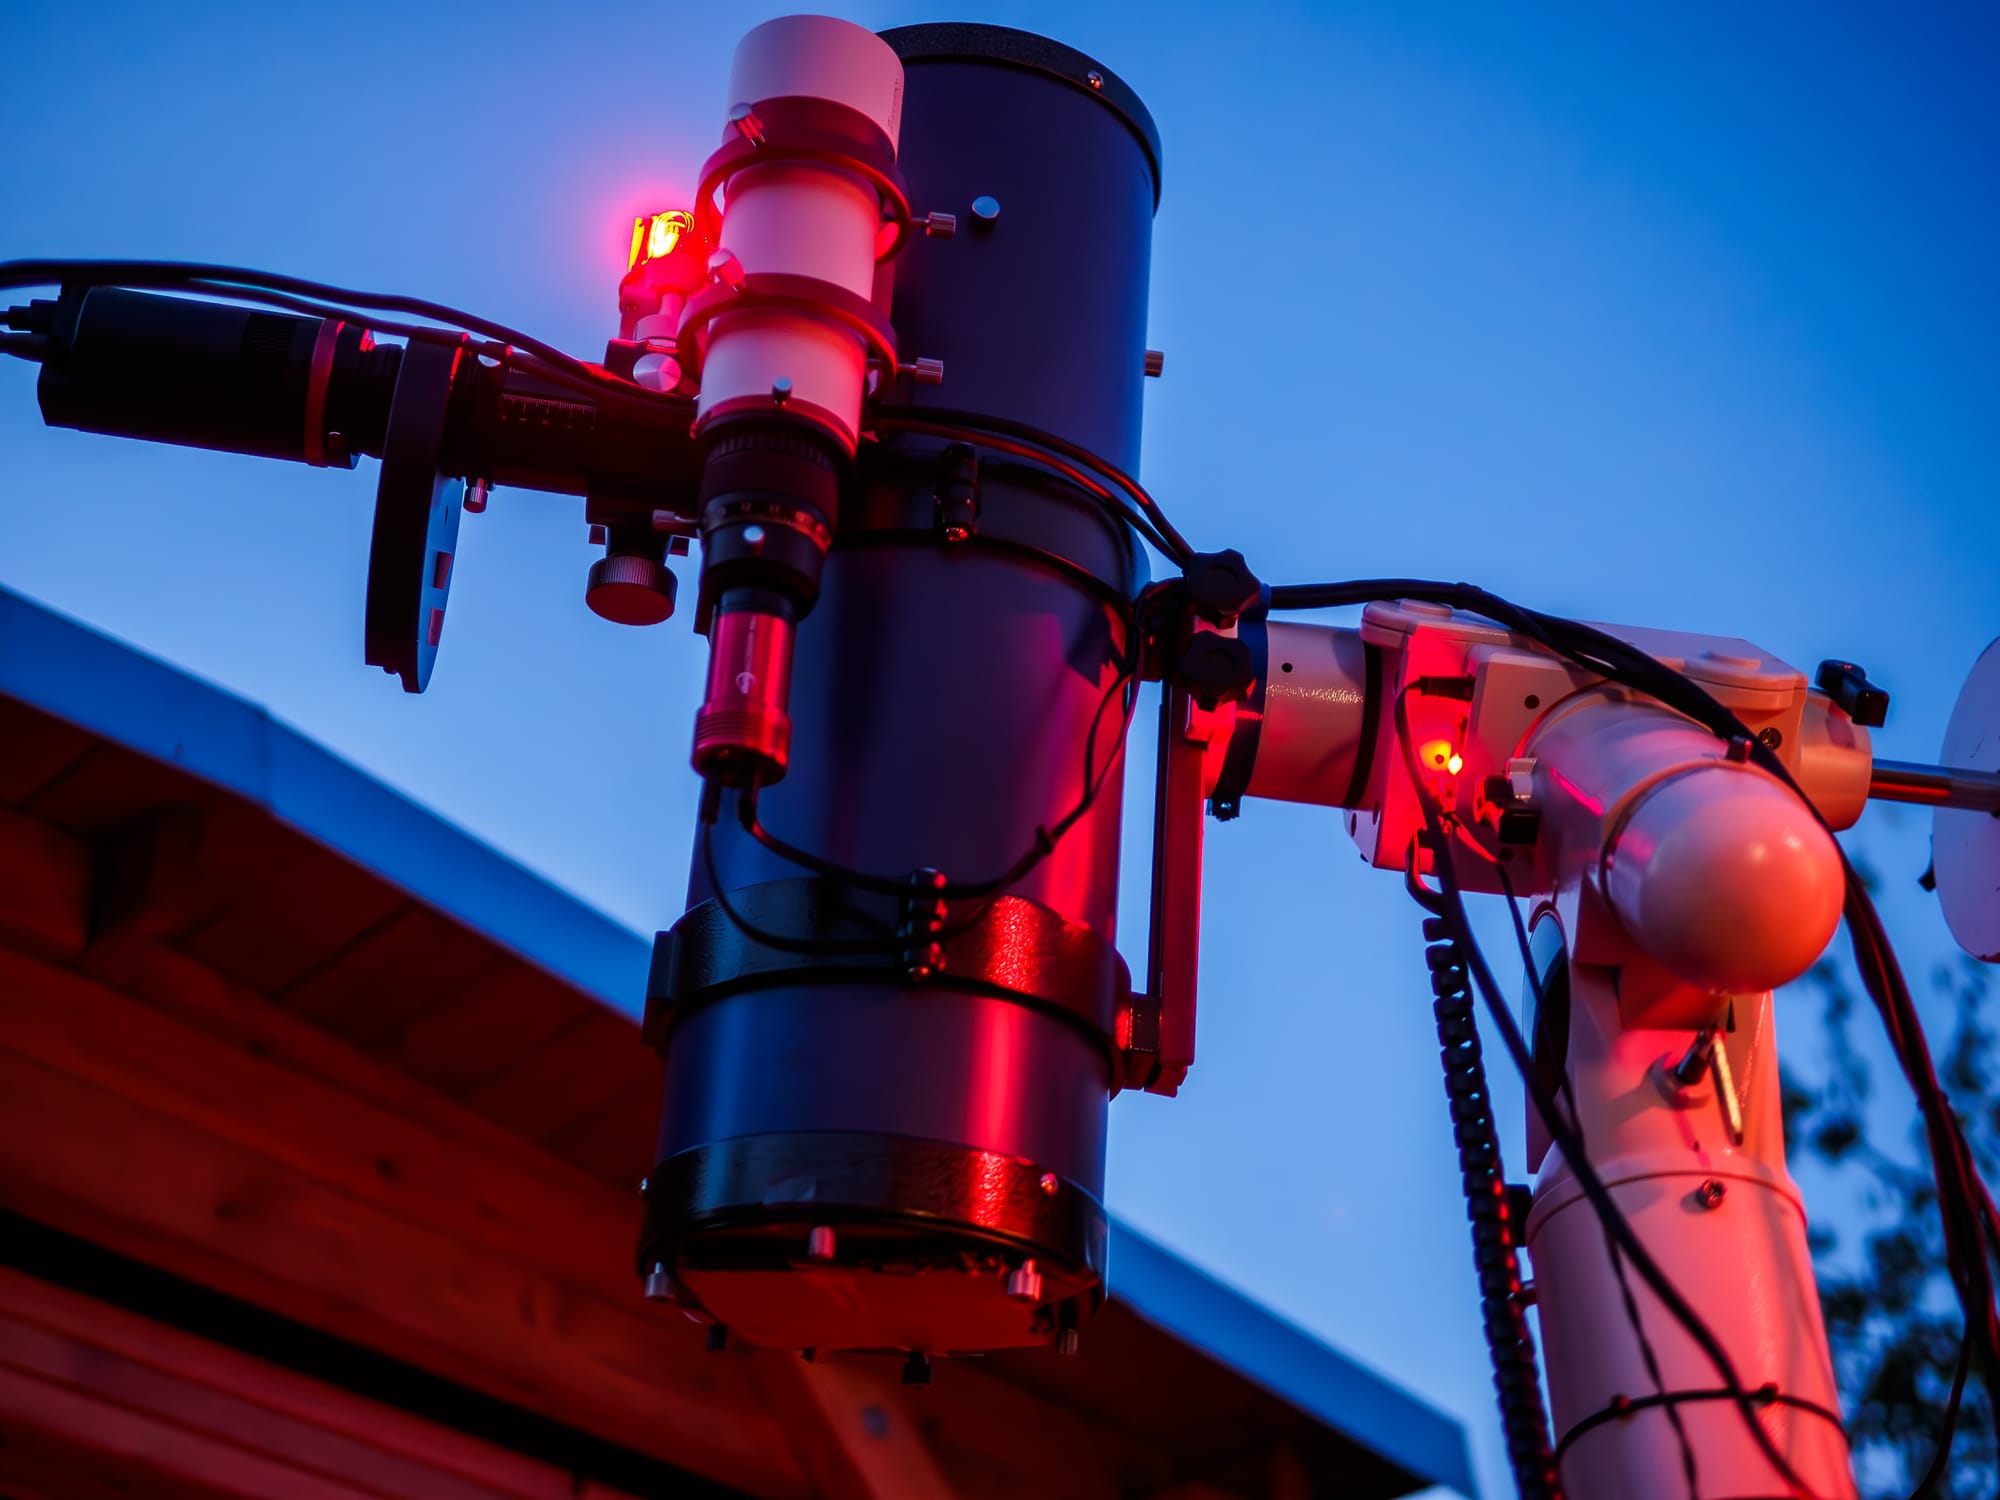
If you're serious about deep-sky imaging with longer lenses or a telescope, it’s time to look at full-featured equatorial mounts. The Sky-Watcher HEQ5 Pro offers excellent tracking accuracy and a respectable 13 kg payload, making it one of the most popular choices for amateur astrophotographers. A step up is the Sky-Watcher EQ6-R Pro, which supports heavier setups and is ideal for refractors in the 80 - 100mm range or even a small Newtonian.
Alongside the mount, you'll want a small refractor telescope (something like a William Optics RedCat or Evostar 72ED), a guide scope with a camera, and ideally, a dedicated astro computer like the ZWO ASIAir to simplify setup and control. For imaging, many astrophotographers opt for dedicated astro cameras such as the ZWO ASI2600MC Pro or Player One Poseidon-C Pro. These cooled CMOS cameras offer exceptional low-light sensitivity and reduced thermal noise, perfect for deep-sky work. For guiding, compact mono cameras like the ZWO ASI120MM Mini or QHY5L-II Mono are popular choices. They’re lightweight, sensitive, and integrate easily into most guiding setups. Power can be supplied via portable lithium batteries or a reliable AC adapter, depending on whether you're in the field or at home.
Setup
No matter what kind of tracking system you’re using, setup is key. With a basic star tracker, it’s a matter of aligning to Polaris, leveling the tripod, and pointing your lens at the sky. But with a full equatorial mount, there’s a bit more to dial in.
The most important part is polar alignment. For trackers, this often involves using a small built-in scope and a smartphone app to fine-tune the position of Polaris. It takes practice, but once you get the hang of it, you can be aligned and ready to go in just a few minutes.
Equatorial mounts, on the other hand, are more complex but also more precise. You’ll usually use a polar scope, or in more advanced workflows, electronic alignment tools like the PoleMaster or the polar alignment function in software like SharpCap or ASIAir. These help you achieve perfect alignment for longer exposures and deeper sky targets.
After polar alignment, you'll need to balance your setup carefully, on both the RA (Right Ascension) and DEC (Declination) axes. This is especially important with heavier gear.
A well-balanced setup ensures smooth tracking, reduces motor strain, and prevents guiding errors.
Once everything is aligned and balanced, it’s time to guide. With longer focal lengths or exposures, you'll want to use an auto-guiding setup.
What Is Auto-Guiding?
When shooting longer exposures, typically over 2 - 3 minutes, or using a telescope with a long focal length, even small tracking errors from your mount can blur the stars. That’s where auto-guiding comes in.
Auto-guiding uses a small secondary camera and guide scope to lock onto a single star in your frame. Specialized software (like PHD2 or the guiding module in ZWO ASIAir) constantly monitors the star’s position. If it drifts even slightly, the software sends real-time corrections to your mount, keeping your main imaging target perfectly centered.
Many astrophotographers now use platforms like the ZWO ASIAir Plus, which handles guiding, plate solving, imaging, and mount control all from a phone or tablet.
It’s a simple concept, but incredibly powerful. With auto-guiding, even mid-range mounts can achieve the precision needed for deep-sky imaging, turning star trails into crisp pinpoints and allowing exposures of 5 minutes or more with confidence.
Auto-guiding adds a layer of complexity to your setup, but the results are well worth it once you're ready to go deeper.
In the Field
Once your mount is aligned and balanced, the real fun begins, capturing and processing the night sky. This is where planning, patience, and workflow matter most.
Start by composing your shot and using manual focus with Live View magnification to get pinpoint stars. Focus can be tricky in the dark, so take your time and zoom in on a bright star to nail it. If you have a Bahtinov mask, it makes this process much easier.
Next, take a series of long-exposure shots, often referred to as light frames. These are the core images that will be stacked to reduce noise and increase detail. For a clean image, you’ll typically shoot 20 - 50 light frames (or more), each between 1 and 5 minutes long, depending on your tracking accuracy and sky conditions.
To get the most out of your data, you’ll also want to capture calibration frames:
- Dark frames help eliminate sensor noise and hot pixels.
- Flat frames correct for vignetting and dust spots on your lens or sensor.
- Bias frames help reduce readout noise from the camera.
Once you have your data, stack your images using software like DeepSkyStacker (Windows), Sequator (Windows), or Siril and PixInsight (Mac/Linux/Advanced). Stacking is a crucial step in astrophotography. By averaging out noise and enhancing the signal, you can reveal fainter details in your target that would be impossible to bring out in a single shot.
Finally, post-processing in Photoshop or PixInsight allows you to stretch contrast, enhance color, and bring your final astro image to life. It may sound daunting at first, but once you go through the workflow a few times, it becomes second nature.
Don’t forget to shoot in RAW, turn off in-camera noise reduction, and take a test shot after every adjustment. The more attention you give to each step, the more the stars will reward you.
Stepping into Deep Sky Territory
With a solid tracking setup and some practice, you’ll find yourself able to photograph:
- Emission nebulae like the Orion Nebula (M42)
- Spiral galaxies like Andromeda (M31)
- Globular clusters like the Hercules Cluster (M13)
- Wide-field compositions of constellations with rich star color and texture
Want even more magnification and detail? You can pair your mount with a small refractor telescope and dive even deeper. Just keep in mind, increased magnification requires greater tracking accuracy, longer exposures, and often auto-guiding.
The Payoff
Yes, astrophotography with a tracker involves more steps. It’s technical. It can be frustrating. But the moment you see a detailed shot of the Orion Nebula with your own camera, you're no longer just taking photos of stars. You’re imaging the cosmos.
You’ll quickly realize, the more you put in, the more the sky gives back.
Final Thoughts
A good tracking mount transforms night photography from casual stargazing into a detailed exploration of the universe. With some patience, practice, and clear skies, your images will go from “that’s cool” to “wait, you took that?”
And that’s where the real magic begins.
Have questions about picking your first tracker or setting up polar alignment? Leave a comment or drop me a message.
Happy shooting!